
Table of contents
Laravel is an open-source PHP framework that works like a ready-made toolbox (think Lego) for building websites and other server-side projects. It gives you the pieces most sites need, so you don’t have to reinvent them:
| Piece | What it handles |
|---|---|
| Routes | Decide what happens when someone visits a URL. |
| Blade templates | Reusable HTML views. |
| Eloquent ORM | Simple PHP syntax for reading and writing database rows. |
| Auth, mail, queues & more | Login, emails, background jobs, and other common features already wired up. |
By plugging these parts together, you can focus on the unique logic of your project while Laravel handles the plumbing—routing requests, talking to the database, and sending back HTML or JSON responses—using modern best practices like MVC, dependency injection, and Composer packages.
Laravel is based of the MVC-Model (Model-View-Controller).
views
In Laravel the views work with the blade templating engine which adds a lot of different useful variables. The views are in: resources -> views. The name of the views files normally will be: “your_file_name”.blade.php. These are used to display the HTML part of the code. They will also be used to make components and layouts.
Automatic Blade variables
Slot/s
Component Slot/s are rendered by echoing the variable: “$slot”. We can pass content into the slot by injecting it into the component.
Like so:
Lets say we have a layout file: “layout.blade.php”
<!doctype html>
<html lang="en">
<head>
    <meta charset="UTF-8">
    <meta name="viewport" content="width=device-width, initial-scale=1.0">
    <meta http-equiv="X-UA-Compatible" content="ie=edge">
    <title>Home Page</title>
</head>
<body>
    <div>
        {{ $slot }}
    </div>
</body>
</html>
Then you also have a views file: “home.blade.php”
<x-layout>
    <h1>Hello, World</h1>
</x-layout>
Now what that does it takes this: “<div><h1>Hello, World</h1></div>” and echo’s it where the “{{ $slot }}” is. you can think of the “{{}}” like a php-echo like the “<?= ?>” php-echo shortcut.
Now what these two code examples above do is the same as this:
<!doctype html>
<html lang="en">
<head>
    <meta charset="UTF-8">
    <meta name="viewport" content="width=device-width, initial-scale=1.0">
    <meta http-equiv="X-UA-Compatible" content="ie=edge">
    <title>Home Page</title>
</head>
<body>
    <div>
        <h1>Hello, World</h1> // {{ $slot }}
    </div>
</body>
</html>
Now here it might not make much sense on why you should do it like this, but once you have a lot of views it will make things a lot easier and more comfortable to adjust and see / understand.
Now you might say that what if i use multiple “$slot” components. How will it know which one im referencing? Well you can modify the slot component for a different slot by naming them. Here’s how:
Lets say we have a layout file: “layout.blade.php”
<!doctype html>
<html lang="en">
<head>
    <meta charset="UTF-8">
    <meta name="viewport" content="width=device-width, initial-scale=1.0">
    <meta http-equiv="X-UA-Compatible" content="ie=edge">
    <title>Home Page</title>
</head>
<body>
    <div>
        {{ $title }}
    </div>

    {{ $slot }}
</body>
</html>
Then you also have a views file: “home.blade.php”
<x-layout>
    <x-slot:title>
            <h1>Hello, World</h1>
    </x-slot>

    <p>Lorem ipsum dolor sit amet consectetur adipiscing elit quisque faucibus ex sapien vitae.</p>
</x-layout>
You may define the content of the named slot using the x-slot tag.
Any content not within an explicit x-slot tag will be passed to the component in the $slot variable.
Now what these two code examples above do is the same as this:
<!doctype html>
<html lang="en">
<head>
    <meta charset="UTF-8">
    <meta name="viewport" content="width=device-width, initial-scale=1.0">
    <meta http-equiv="X-UA-Compatible" content="ie=edge">
    <title>Home Page</title>
</head>
<body>
    <div>
        <h1>Hello, World</h1> // {{ $title }}
    </div>

    <p>Lorem ipsum dolor sit amet consectetur adipiscing elit quisque faucibus ex sapien vitae.</p> // {{ $slot }}
</body>
</html>
attributes
Now the attributes component is basically the same as the slots component. The variable is $attributes but instead of just injecting whatever this is used for attributes like: href=””, src=””, class=””, id=””, etc.
props
The @props directive lets you list attributes that should be treated as data variables / properties (props). What that does is that they will no longer be passed through the “$attributes” variable / component.
@props([
    'type' => 'submit',  // default value
    'text',              // required – no default provided
])- Each array key becomes a local variable (
$type,$text) you can echo anywhere in the template. - Default values (
'submit') are used when the caller omits the attribute. - Leaving out a default makes the prop required; Laravel will throw an exception if the caller doesn’t pass it.
- Anything not listed here is still available via
{{ $attributes }}for transparent pass-through to your root element.
Now when you call a prop name and give it a value of “false” it will be interpreted as a string not a Boolean. So what you can do it prefix it with a colon (:). Because in Laravel and Blade when you prefix a prop name with a colon (:) it indicates that the value that you provide should be treated as an expression rather than a string.
Layouts
Layouts are used to display HTML code that you can use for every view no matter the content. This usually includes basic styles like the header, navigation bar (nav-bar) and the footer. Now it might occur that the nav-bar usually has some hardcoded styles for examples to visualize on which page your on but that can be made dynamic as well.
Here’s an example:
This is in the “nav-link.blade.php” file
@props(['active' => false])
<a class="{{ $active ?  "bg-gray-900 text-white": "text-gray-300 hover:bg-gray-700 hover:text-white" }} rounded-md px-3 py-2 text-sm font-medium text-white"
    aria-current="{{ $active ?  "page": "false" }}"
   {{ $attributes }}
>{{ $slot }}</a>
And here’s the layout file: layout.blade.php:
<div class="ml-10 flex items-baseline space-x-4">
    <x-nav-link href="/" :active="request()->is('/')">Home</x-nav-link>
    <x-nav-link href="/about" :active="request()->is('about')">About</x-nav-link>
    <x-nav-link href="/contact" :active="request()->is('contact')">Contact</x-nav-link>
</div>
So the “@props” is responsible for determining which link (<a></a>) is active and it has a default value of false.
The second line of code checks is a link is active or not and then gives the corresponding style (“bg-gray-900 text-white” if true, “text-gray-300 hover:bg-gray-700 hover:text-white” if false).
The 3rd line of code does pretty much the same just instead of setting a style it give an attribute so for example, screen readers know & will say that this is the current page.
The “{{ $attributes }}” holds the href=”” attribute & value (/, /about, /contact).
The “{{ $slot }}” if for the text (Home, About, Contact).
So all in all depending on the request that is made in the URL, for example: “website.test/about” then it will give the “About link” in the nav-bar the “active Styling”.
Routes
There’s two types of routing, URI routing and URL routing they are mostly the same but have a few differences:
| Aspect | “URL routing” | “URI routing” |
|---|---|---|
| Historical usage | Older web frameworks (e.g., classic ASP, early Rails, early Django) spoke of URL routing because a browser request always arrived as a full URL and that was all that mattered. | Standards-minded frameworks (e.g., Java JAX-RS, ASP.NET Core, Go’s net/http) and REST literature prefer URI because REST talks about generic identifiers, not just locators. |
| Exact string they match | Typically the path and query portion of a URL that reached the server, after scheme/host/port are stripped. | Same in practice—most servers still only look at the path—but the docs choose the broader, standards-correct word “URI”. |
| Implication for you | None; the router’s job is the same. | Same. |
| When the distinction matters | If a framework offers multi-protocol routing (e.g., mapping mailto: or WebSocket schemes) it may emphasise URI to signal that you can match non-HTTP identifiers. | If you only ever serve HTTP(S), “URL routing” may feel clearer to newcomers. |
But here in Laravel we talk about URI routing. Here’s an example on how it can look like:
This is a simple route:
Route::get('/', function () {
    return view('home');
});
If you call the normal URL example: project.test, then it will return the home view (home.blade.php) in this case.
Now another cool thing that you can do is assign a value to a variable which you can then directly access from the view file. In this case the “home.blade.php” file.
Here’s an example:
Route::get('/', function () {
    return view('home', ['name' => 'Jack']);
});
Now in the “home.blade.php” file you can simply access it like this:
<h1>Hello, {{ $name }}</h1>Now when you call the home view you will see: Hello, Jack
request()
“request()” listens for a type of request, for example:
We have a variable called “$active”. Now we only want to assign this class to link in the nav-bar once we are actually on this page. So what we can do is something like this:
<div class="ml-10 flex items-baseline space-x-4">
    <x-nav-link href="/" :active="request()->is('/')">Home</x-nav-link>
    <x-nav-link href="/about" :active="request()->is('about')">About</x-nav-link>
    <x-nav-link href="/contact" :active="request()->is('contact')">Contact</x-nav-link>
 </div>
Now what this does with the help of “request()” we can check for what URL request in this case is called and then based on that we can assign the “active” variable. So the “request()->is(‘/’)” it checks what the request is and if the request is “/” then it will assign the “active” variable to the “Home” link.
Artisan
artisan help
“php artisan help” doesnt work on it’s own, it displays information an a given command but as mentioned for that you also need to provide the command you want help with. For example: “php artisan help make:model” or “php artisan help migrate” and so on.
It displays information on all the different variations of this command and what they do, so quite useful.
php artisan help (whichever command you want details on for example what they can do or what it does)artisan tinker
php artisan tinker is a command line interface included with Laravel that allows you to interact with your application’s code and data directly from the command line. It’s essentially a REPL (read-eval-print loop) that allows you to execute PHP code within the context of your application.
An important thing to remember is that each tinker session has a memory, meaning that if you open a tinker session and change something it wont be applied / recognized in the current tinker session, so you have to close the current one with: “ctrl + c” and open a new one.
The command to access this is the following (command prompt):
php artisan tinkerartisan migrate
The command “php artisan migrate” is used to run / re-run the migration files in your project. The migration files hold the code on how to create the tables.
Here’s an example with “php artisan migrate“.
php artisan migrateartisan seed
The “php artisan db:seed” command allows you to seed your database, meaning that it can create rows in a table or whatever you programmed it to do. This is often used with “php artisan migrate:fresh”.
Here’s an example with “php artisan db:seed“.
php artisan db:seedartisan make
The “php artisan make” command as in the name makes you something, this can range from views to migrations to models and much more.
Here’s an example with “php artisan make:model“.
php artisan makeartisan vendor:publish
“php artisan vendor:publish” copies a package’s publishable files—such as config, views, assets, migrations—from the vendor/ directory into your app’s own folders (e.g., config/, resources/views/). That way you can modify them safely without them being overwritten on the next Composer update.
Here’s an example with “php artisan vendor:publish“
php artisan vendor:publishEloquent
Eloquent is an ORM (Object Relational Mapper). An ORM maps an object in your database, like a table row, to an object in PHP code. This is Laravel’s Active Record implementation.
Now an important thing to remember the Class is the singular form of the Table name. For example:
- jobs -> Job
- comments -> Comment
- job_listings -> JobListing
Now if for example you have a table called “jobs” and “jobs_listings” if you call from the Job Eloquent Class it will automatically reach for the “jobs table”. As mentioned before you can either just change the name of the class but there’s another way, where you can choose a unique table name. Here’s how:
class Job extends Model {
    protected $table = 'job_listings';
}
So what you do is add a protected property called “table” and assign it “job_listings”.
Create new database row
Important! This is written inside the command prompt under: “php artisan tinker“
You can of course also create a new table. You can simply run this code:
App\Models\Job::create(['title' => 'Acme Director', 'salary' => '$1,000,000']);Now when you try this code just so you will get the following error:
Illuminate\Database\Eloquent\MassAssignmentException Add [title] to fillable property to allow mass assignment on [App\Models\Job].The reason for this is, that since you always assume that a user is trying to do something bad or damaging to the site. For example he might be trying to change the “author_id” for a certain post, that could be very bad. To prevent that Laravel automatically refused to execute such code to protect you / your website or well more so it ignores that request.
Though this isn’t really a problem as long your 100% aware of what’s in the code, meaning what gets changes, created or deleted.
Now you could just disable this feature or basically make an exception for certain
Here’s how (code editor):
class Job extends Model {
    protected $table = 'job_listings';

    protected $fillable = ['title', 'salary'];
}
What you do is add a protected property called “fillable” and assign which attributes you want to enable multiple to be changes of at the same time. In this case it is “title” and “salary”. Now if you run the code above again it will / should work.
Delete database row
And there’s also a simple way to delete a created row.
First you need to assign in to a variable, like so:
$job = App\Models\Job::find(4);Then you can just call this command to delete the row:
$job->delete();Create new Model
Now above we we used a pre-existing Job class that we converted into an Eloquent model. But usually you will start from scratch, so we will go over how to do that.
Well firstly we need to create a new Model:
If you run this code in your command prompt you will see a list of different commands and what they do:
php artisan help make:modelDescription:
Create a new Eloquent model class
Usage:
make:model [options] [--] <name>
Arguments:
name The name of the model
Options:
-a, --all Generate a migration, seeder, factory, policy, resource controller, and form request classes for the model
-c, --controller Create a new controller for the model
-f, --factory Create a new factory for the model
--force Create the class even if the model already exists
-m, --migration Create a new migration file for the model
--morph-pivot Indicates if the generated model should be a custom polymorphic intermediate table model
--policy Create a new policy for the model
-s, --seed Create a new seeder for the model
-p, --pivot Indicates if the generated model should be a custom intermediate table model
-r, --resource Indicates if the generated controller should be a resource controller
--api Indicates if the generated controller should be an API resource controller
-R, --requests Create new form request classes and use them in the resource controller
--test Generate an accompanying Test test for the Model
--pest Generate an accompanying Pest test for the Model
--phpunit Generate an accompanying PHPUnit test for the Model
-h, --help Display help for the given command. When no command is given display help for the list command
--silent Do not output any message
-q, --quiet Only errors are displayed. All other output is suppressed
-V, --version Display this application version
--ansi|--no-ansi Force (or disable --no-ansi) ANSI output
-n, --no-interaction Do not ask any interactive question
--env[=ENV] The environment the command should run under
-v|vv|vvv, --verbose Increase the verbosity of messages: 1 for normal output, 2 for more verbose output and 3 for debugNow if you run:
php artisan make:model JobIt will create a new Eloquent model called Job in this location: app\Models
Or if you run:
php artisan make:model Job -mYou will create a new Eloquent model called Job in this location: app\Models and a new migration here: database\migrations
Now to keep in mind this migration doesn’t have any instructions on what to create so you will have to adjust that manually in your code editor.
This is the default code for the Eloquent model and migration (read more about migrations here):
Eloquent Model:
<?php

namespace App\Models;
// use Illuminate\Database\Eloquent\Factories\HasFactory;

use Illuminate\Database\Eloquent\Model;

class Job extends Model
{
    // use HasFactory (so you can use a Factory)

}
migration:
<?php

use Illuminate\Database\Migrations\Migration;
use Illuminate\Database\Schema\Blueprint;
use Illuminate\Support\Facades\Schema;

return new class extends Migration
{
    /**
     * Run the migrations.
     */
    public function up(): void
    {
        Schema::create('job_listings', function (Blueprint $table) {
            $table->id();
            // $table->string('title'); (an example of what you might want to add)
            // $table->string('salary');
            $table->timestamps();
        });
    }

    /**
     * Reverse the migrations.
     */
    public function down(): void
    {
        Schema::dropIfExists('job_listings');
    }
};
Eloquent Relationship
(Might be easier to understand if you read Factories first) Eloquent Relationships are defined in the Model used to access data from a different table inside the database.
Here’s how you can do that (command prompt inside a tinker session):
$job = App\Models\Job::first();

// then call the function

$job->employer;

// now you can access properties inside the employer tabel

$job->employer->name;
You call the function, not as a function but instead as a property like (title, salary, etc.), Laravel realizes that there isn’t a property called “employer” and assumes that your trying to access the employer relationship.
Here’s how it will look in the code editor:
public function category()
{
    return $this->belongsTo(Category::class);
}
All different Relationship:
- hasOne ->
- 1:1, One person owns exactly one passport, and each passport belongs to one person.
- belongsTo ->
- 1:m, A Comment belongs to a Post
- hasMany ->
- m:1, A post can have many Comments
- hasOneThrough ->
- 1:1, A patient is registered with one hospital, and that hospital has one chief doctor (medical director). You want
patient->primaryDoctorwithout first loading the hospital.
- 1:1, A patient is registered with one hospital, and that hospital has one chief doctor (medical director). You want
- hasManyThrough ->
- m:1, A country has many users, and each user writes many blog posts. You’d like
country->postsdirectly.
- m:1, A country has many users, and each user writes many blog posts. You’d like
- belongsToMany ->
- m:m, Students enroll in multiple courses, each course has multiple students.
Pivot / Relationship tables
Pivot tables are a table that exist of two or more foreign keys. So they are used to create a connection between 2 different tables.
For example you have a table with different Jobs and a list with different Tags. This will be a “belongsToMany” Relationship because a Job can have multiple different Tags but the Tag can also have multiple different Tags.
Now you will need a table for it, as for the name usually just name it “Model1_Model2” in this example “job_tag”. Here’s how the migration file can look like:
<?php

use Illuminate\Database\Migrations\Migration;
use Illuminate\Database\Schema\Blueprint;
use Illuminate\Support\Facades\Schema;

return new class extends Migration
{
    /**
     * Run the migrations.
     */
    public function up(): void
    {
        Schema::create('tags', function (Blueprint $table) {
            $table->id();
            $table->string('name');
            $table->timestamps();
        });

        Schema::create('job_tag', function (Blueprint $table) {
            $table->id();
            $table->foreignIdFor(\App\Models\Job::class, 'job_listing_id')->constrained()->cascadeOnDelete();
            $table->foreignIdFor(\App\Models\Tag::class)->constrained()->cascadeOnDelete();
            $table->timestamps();
        });
    }

    /**
     * Reverse the migrations.
     */
    public function down(): void
    {
        Schema::dropIfExists('tags');
        Schema::dropIfExists('job_tag');
    }
};
Now in this migration file there are two tables being created. The reason for that is because it was done at the same time (the “tags” table and the “job_tag” table), but it can just as well be in a separate migration file.
You might notice that in the call for the foreign key of the Job class there’s extra text, that’s because Laravel defaults to the “jobs” table that exists as well. But we want the “job_listings” table or well the id and that’s what that is for to specify which table we want.
Now you also need functions in your PHP code so you can access the other table. Here’s how:
// The Job Model (app->Models->Job.php)
public function tags()
{
    return $this->belongsToMany(Tag::class, foreignPivotKey: 'job_listing_id');
}

// The Tag Model (app->Models->Tag.php)
public function jobs()
{
    return $this->belongsToMany(Job::class, relatedPivotKey: 'job_listing_id' );
}
Now normally you don’t need the foreign / related PivotKey but as mentioned above this is needed in this case because Laravel defaults to the “jobs” table but we want the “job_listings” table and that what the Pivot does it specifies that we want the “job_listing_id” well from the “job_listings” table of course.
Migrations
A migration displays a table in a database. What’s special about this is that this is written in PHP and you can directly access it from your project folder / code editor.
In Laravel it will automatically create them for you to a certain extend. You can find all these migrations in the following directory: database->migrations.
There are a few different commands you can run to execute these migration files (command prompt).
php artisan migrate:fresh // Drop all tables and re-run all migrations

php artisan migrate:install // Create the migration repository

php artisan migrate:refresh // Reset and re-run all migrations

php artisan migrate:reset // Rollback all database migrations

php artisan migrate:rollback // Rollback the last database migration

php artisan migrate:status // Show the status of each migration
The main ones you will probably use are:
- php artisan migrate:fresh
- php artisan migrate:refresh
- php artisan migrate:reset
Now if you want to run the new or changed migrations then you can run (command prompt):
php artisan migrateIf you want to create a new migration you call this command (command prompt):
php artisan make:migrationNow if you look at a migration file in your code editor you notice 2 functions:
up
public function up(): void
{

}
Now in here you will put all the code that you want / need when you run the migrations. For example:
public function up(): void
{
    Schema::create('job_listings', function (Blueprint $table) {
        $table->id();
        $table->string('title');
        $table->string('salary');
        $table->timestamps();
    });
}
What this does once the migration is run it will create a “job-listings” table and inside the table a row for: id, title, salary and timestamps.
down
public function down(): void
{

}
This is for when you want to reverse the migration. For example:
public function down(): void
{
    Schema::dropIfExists('job_listings');
}
This drops (deletes) the table “job_listings” and all the content inside it.
Factories
You can use Factories to quickly scaffold example data. Meaning that you can very easily create a few dozen to hundreds or even thousands of rows / entries of example data in a database table.
Create a Factory
Here’s how you can create a factory (command prompt):
php artisan make:factory JobFactoryThis will create a “PostFactory” Factory class in: database\factories
This is how it will look like in your code editor:
<?php

namespace Database\Factories;

use Illuminate\Database\Eloquent\Factories\Factory;

/**
 * @extends \Illuminate\Database\Eloquent\Factories\Factory<\App\Models\Job>
 */
class JobFactory extends Factory
{
    /**
     * Define the model's default state.
     *
     * @return array<string, mixed>
     */
    public function definition(): array
    {
        return [
            // add the columns you have in your db. For example:
            // 'title' => fake()->jobTitle(),
            // 'salary' => fake()->numberBetween(50000, 150000),
        ];
    }
}
Call a Factory
To call this factory, use the following command in your command prompt in a tinker session:
App\Models\Job::factory()->create();Now this create a new row with a random job name and a random salary between 50,000 and 150,000.
If you want to create 100 rows you can just add the amount like here:
App\Models\Job::factory(100)->create();Now it will create 100 rows with random job names and salary in milliseconds / seconds.
Override Values
Now mainly for testing purposes you might want to change certain values. There’s also an easy way to do that, but lets switch to a user factory for a easier example.
Let’s say this is your basic factory function:
public function definition(): array
{
    return [
        'first_name' => fake()->firstName(),
        'last_name' => fake()->lastName(),
        'email' => fake()->unique()->safeEmail(),
        'email_verified_at' => now(),
        'password' => static::$password ??= Hash::make('password'),
        'remember_token' => Str::random(10),
        'admin' => false
    ];
}
Now as mentioned before for tests you might want to make a user a “admin” or make him unverified. Here’s how:
public function unverified(): static
{
    return $this->state(fn (array $attributes) => [
        'email_verified_at' => null,
    ]);
}

public function admin(): static
{
    return $this->state(fn (array $attributes) => [
        'admin' => true,
    ]);
}
To call these functions its a bit different but still simple. Here’s how (again in the command prompt in a tinker session):
App\Models\user::factory()->unverified()->create(); // to make a unverified user

App\Models\user::factory()->admin()->create(); // to create a admin user
How they work is they take the values given in the “definition()” function and then overrides the values with the ones in the given (in this case) “unverified()” / “admin()” functions.
Assign a Foreign Key (Relationships)
When working with database’s you will most probably use or have used or at least heard of Primary & Foreign Keys. To add a Foreign Key in a Factory do the following:
Let’s say you have a table called “jobs_listing” with the class in PHP called Job and a table called “employer” with the class in PHP called “Employer”. And you want the Foreign Key in the “jobs_listing” table.
In the “jobs_listing” migration file, add either of these both work the same:
public function up(): void
{
    Schema::create('job_listings', function (Blueprint $table) {
        // $table->id();
        $table->unsignedBigInteger('employer_id');
        // either the one above or below
        $table->foreignIdFor(\App\Models\Employer::class);
        // $table->string('title');
        // $table->string('salary');
        // $table->timestamps();
    });
}
And if your wondering why “BigInteger” its because that’s what an id is its a big integer that automatically increments.
Now since you’ll probably also want this in your factory add this in the “JobFactory” file:
public function definition(): array
{
    return [
        // 'title' => fake()->jobTitle(),
        'employer_id' => Employer::factory(),
        // 'salary' => '$' . fake()->numberBetween(50000, 150000),
    ];
}
N+1 problem
The N+1 problem refers to a database queries executed within a loop, rather than making a single query that loads all of the relevant data up front.
This means that a new query is executed for every item you load from the database. This can really affect your website’s loading speed.
If you want to see how many queries there’s a a helpful package (similar to an extension) that you can download via composer: Laravel-debugbar
This is really useful it shows you the loading speed of the different parts (Booting, Application, Routing, etc.), the amount of Models & Views and of course the amount of Queries loaded.

Now how you can fix that for example if you have the code like this:
This is called lazy loading: Pulls the main record first; related data is fetched only when you actually access it.
– Pros: keeps the initial payload light and fast if you never touch the extras.
– Cons: every access triggers another query or request, which can add latency or flood the database if done in a loop (N+1).
Route::get('/jobs', function (){
    return view('jobs', [
        'jobs' => Job::all()
    ]);
});
And change it to this:
This is called eager loading: Fetches the main record and its related data in one go.
– Pros: avoids the “N + 1” query problem and gives you all the data right away.
– Cons: can pull back more data than you’ll actually use, increasing memory and transfer size.
Route::get('/jobs', function (){
    $jobs = Job::with('employer')->get();

    return view('jobs', [
        'jobs' => $jobs
    ]);
});
What this code does it load all of the jobs, with the employer once in the beginning and not every time it loops to load a job. Reducing the query amount and therefor the loading time (in this example).
Pagination
Pagination helps managing large datasets by fetching and displaying smaller chunks instead of all at once. Because when you fetch thousands of records at once it can overwhelm your browser. Pagination limits the number of records retrieved and displayed per page, improving performance and user experience.
Implementing Pagination
If you have the “web.php” routes file like this, where you call the “get()” function:
// Route::get('/jobs', function (){
    $jobs = Job::with('employer')->get();
Replace your query like this:
$jobs = Job::with('employer')->paginate(3);This fetches 3 jobs per page along with their employers.
Displaying Pagination Links
In your Blade view, render pagination links with:
{{ $jobs->links() }}Laravel automatically generates styled pagination controls, assuming you use Tailwind CSS by default.
Customizing Pagination Views
If you want to customize the pagination markup or use a different CSS framework like Bootstrap, publish the pagination views:
php artisan vendor:publish --tag=laravel-paginationThis copies the pagination views into your resources/views/vendor/pagination directory for editing.
To switch the default pagination view (e.g., to Bootstrap 5), configure it in AppServiceProvider:
use Illuminate\Pagination\Paginator;

public function boot()
{
    Paginator::useBootstrapFive();
}
Pagination Types
- Standard Pagination: Shows page numbers and navigation links.
- Simple Pagination: Shows only “Previous” and “Next” links, reducing query complexity.
- Cursor Pagination: Uses a cursor (encoded string) for efficient pagination on large datasets but lacks direct page number navigation.
Example for simple pagination:
$jobs = Job::with('employer')->simplePaginate(3);Example for simple pagination:
$jobs = Job::with('employer')->cursorPaginate(3);How Pagination Queries Work
Standard pagination uses SQL LIMIT and OFFSET to fetch the correct subset of records.
Cursor pagination uses an encoded cursor to fetch records after a certain point, avoiding the performance cost of large offsets.
Seeders
Normally after running “php artisan migrate:fresh“, your database tables are recreated but empty. Manually inserting data each time is tedious, so seeders automate this process.
Seeders are classes located in the database/seeders directory. The default DatabaseSeeder class is your entry point to run multiple seeders.
To run seeders, use:
php artisan db:seedCreating and Running Seeders
If you encounter errors like missing columns, ensure your seeders and factories match your database schema.
You can combine migration and seeding in one command:
php artisan migrate:fresh --seedThis drops all tables, runs migrations, and seeds the database in one go.
Using Factories in Seeders
Seeders often use factories to generate large amounts of fake data quickly:
\App\Models\Job::factory(200)->create();This creates 200 job records using the factory definition.
It’s easy to call a factory in a seeder. Here’s how:
Job::factory(200)->create();Splitting Seeders for Flexibility
You can create multiple seeder classes for different parts of your database:
php artisan make:seeder JobSeederThis makes a new seeder class called “JobSeeder”.
This allows running seeders individually or in groups, useful for testing or partial data refreshes.
In your DatabaseSeeder, call other seeders:
public function run()
{
    $this->call([
        UserSeeder::class,
        JobSeeder::class,
    ]);
}
Forms
Defining Routes for Forms
When adding a route for creating a new job, use the URI jobs/create. Be mindful of route order: wildcard routes like jobs/{id} should come after specific routes like jobs/create to avoid conflicts.
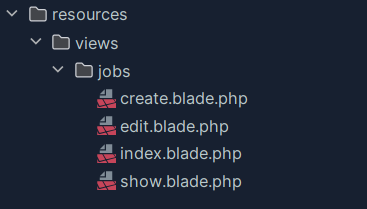
Organizing Views
Group related views in folders, e.g., place all job-related views in a jobs directory. Use common naming conventions:
index.blade.phpfor listing all jobsshow.blade.phpfor displaying a single jobcreate.blade.phpfor the form to create a job
Use dot notation in views references, e.g., 'jobs.create'.
Building the Form
Use a Tailwind UI form template, trimming unnecessary sections and adjusting input fields to match your database columns (title, salary). Add placeholders and padding for better UX.
Handling Form Submission
By default, forms submit via GET to themselves. Change the form method to POST and set the action to /jobs to follow RESTful conventions for creating resources.
Add a POST route for /jobs in your routes file to handle form submissions.
Accessing Request Data
Use the request() helper to retrieve form data:
$request->all(); // all form data
$request->input('title'); // specific field
Creating Records
Create a new job record using Eloquent’s create() method with the request data:
Job::create([
    'title' => $request->input('title'),
    'salary' => $request->input('salary'),
    'employer_id' => $employerId, // typically from authenticated user
]);
Remember to include employer_id in your model’s $fillable array or disable mass assignment protection accordingly.
Redirecting After Submission
After creating the job, redirect the user back to the jobs listing page:
return redirect('/jobs');Extracting Form Components
To build forms efficiently you should / need to create reusable Blade components for:
form-label.blade.php— for form labelsform-error.blade.php— for displaying validation errorsform-input.blade.php— for input fields
These components accept attributes and slots to make them flexible.
Here’s an example of the usage in a form:
<x-form-label for="title">Title</x-form-label>
<x-form-input id="title" name="title" required />
<x-form-error name="title" />
CSRF
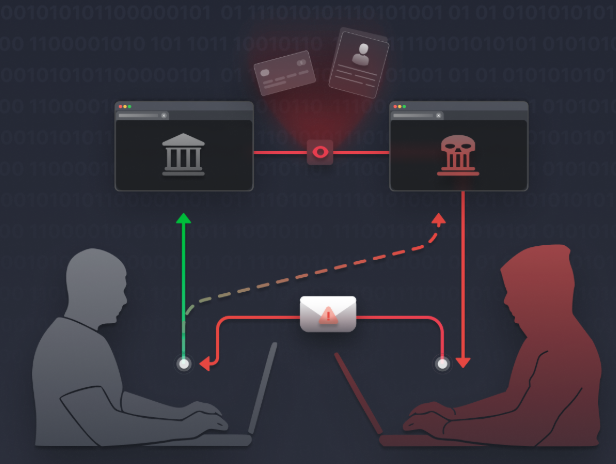
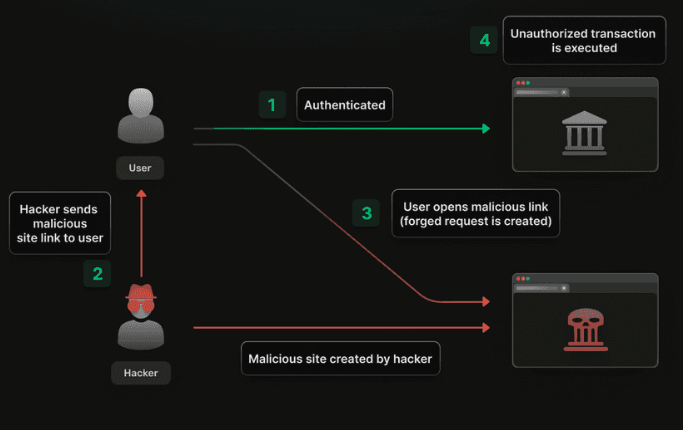
CSRF stand for Cross-site request forgery , it’s a web security vulnerability that allows an attacker to induce users to perform actions that they do not intend to perform.
CSRF is an attack where a malicious site tricks a user’s browser into submitting unauthorized requests to a trusted site where the user is authenticated.
CSRF Protection
Laravel protects against CSRF attacks by requiring a token in POST requests. Add the Blade directive @csrf inside your form to include a hidden token input.
Like so:
<form method="POST" action="/jobs">
    @csrf
What this does it adds a hidden input field with a specific value. So if that value doesn’t match with the one saved on the site and you submit (try to atleast) it gives a 419 error (page expired). Here’s how the hidden input file looks like:

Anytime you define a “POST”, “PUT”, “PATCH”, or “DELETE” HTML form in your application, you should include a hidden CSRF _token field in the form so that the CSRF protection middleware can validate the request.
Validation
Adding a Create Job Button
To make it easy to access the job creation form, add a “Create Job” button in your layout’s header section. Use Tailwind CSS classes to style it like a button and position it using Flexbox utilities:
<a href="/jobs/create" class="your-tailwind-button-classes">Create Job</a>Consider extracting this into a reusable Blade component for cleaner code. Here’s how:
Firstly you need to make a new file in the components Directory and name it like this for example: “button.blade.php“. Then copy the <a></a> from above and adjust it so it looks like this:
<a {{ $attributes->merge(['class' => 'relative inline-flex items-center px-4 py-2 -ml-px text-sm font-medium text-gray-700 bg-white border border-gray-300 leading-5 hover:text-gray-500 focus:z-10 focus:outline-none focus:ring ring-gray-300 focus:border-blue-300 active:bg-gray-100 active:text-gray-700 transition ease-in-out duration-150 rounded-md']) }}>{{ $slot }}</a>
Then you can adjust the layout file to this to pull in the button:
<x-button href="/jobs/create">Create Job</x-button>Defining Routes for Form Submission
Add a POST route to /jobs to handle form submissions. Initially, add a simple sanity check with dd('hello from POST') to confirm the route is hit.
Accessing Request Data
Use the request() helper to retrieve form inputs:
$request->all(); // all inputs
$request->input('title'); // specific input
Server-Side Validation
Use Laravel’s built-in validation method in your POST route:
$request->validate([
    'title' => ['required', 'min:3'],
    'salary' => ['required'],
]);
If validation fails, Laravel automatically redirects back with error messages. Here’s a list of all different Validations rules in Laravel: Validation Rules
Displaying Validation Errors
In your Blade view, display errors globally:
@if ($errors->any())
    <ul>
        @foreach ($errors->all() as $error)
            <li class="text-red-500">{{ $error }}</li>
        @endforeach
    </ul>
@endif
Or display errors inline below each input using the @error directive:
@error('title')
    <p class="text-red-500 text-sm">{{ $message }}</p>
@enderror
Client-Side Validation
Add the required attribute to inputs for instant browser validation, enhancing user experience.
Creating Records and Redirecting
After validation, create the job record with Eloquent:
Job::create([
    'title' => $request->input('title'),
    'salary' => $request->input('salary'),
    'employer_id' => $employerId, // typically from authenticated user
]);

return redirect('/jobs');
Remember to include all mass-assignable fields in your model’s $fillable array or disable mass assignment protection as needed.
CRUD
CRUD stand for Create, Read, Update, Delete. This contains the whole roundtrip for a resource. A resource involves (in example of Jobs): show all jobs, show a single job, create a job, store a job (save the newly created job in the database), edit a job, update a job and delete a job.
Here’s how that could look like in your files:
So inside the resources in the view folder you create a new directory for your resource. In this case its jobs (Job) and in there goes everything that involves interacting with said jobs (that need a visual of course). Here’s a list of what the different files contain / do:
- index.blade.php -> shows all the jobs
- show.blade.php -> shows a single job
- create.blade.php -> shows the “Create Job” visual (create & store a job)
- edit.blade.php -> shows the “Edit Job” visual (edit, update & delete a job)
Here’s another explanation (but only PHP specific nothing with Laravel): Routes & Request Methods
Adjusting the Routes file:
Now when you add new views you of course also need new routes so you can access them. Here’s how you do that:
// index
Route::get('/jobs', function (){
    $jobs = Job::with('employer')->latest()->paginate(3);

    return view('jobs.index', [
        'jobs' => $jobs
    ]);
});

// create
Route::get('/jobs/create', function (){
    return view('jobs.create');
});

// show
Route::get('/jobs/{id}', function ($id){
    $job = Job::find($id);

    return view('jobs.show', ['job' => $job]);
});

// store
Route::post('/jobs', function () {
    request()->validate([
        'title' => ['required', 'min:3'],
        'salary' => ['required']
    ]);
    Job::create([
        'title' => request('title'),
        'salary' => request('salary'),
        'employer_id' => 1
    ]);

    return redirect('/jobs');
});

// edit
Route::get('/jobs/{id}/edit', function ($id){
    $job = Job::find($id);

    return view('jobs.edit', ['job' => $job]);
});

// update
Route::patch('/jobs/{id}', function ($id){
    request()->validate([
        'title' => ['required', 'min:3'],
        'salary' => ['required']
    ]);
    // authorize (on hold)

    $job = Job::findOrFail($id);

    $job->update([
        'title' => request('title'),
        'salary' => request('salary')
    ]);

    return redirect('/jobs/' . $job->id);
});

// destroy
Route::delete('/jobs/{id}', function ($id){
    // authorize (on hold)

    Job::findOrFail($id)->delete();

    return redirect('/jobs');
});
So as shown above you will need a route for each part of “CRUD”: index (show all jobs), create (create a job), show (show a single job), store (add job to database), edit (edit a job), update (update a job) and destroy (delete a job).
Request Methods
Initially your browser only supports “get” and “post” requests but most common frameworks (therefor Laravel) understand a few more. Let’s look at “patch” (update) and “delete”.
Now let’s say you have a form to edit the Job to continue a familiar example if you want to give that form a “patch” or “delete” request (Method=”(PATCH / DELETE)”) you will get an error. That is because as mentioned above browsers only support “get” and “post”. So let’s look how we can make that work.
Laravel has an easy way to deal with this. Basically what you do is you make it a “post” request but tell Laravel to handle it as a “patch” or “delete” request. So the browser is happy because it’s still a “post” request but it also works as you wanted. Here’s how:
<form method="POST" action="/jobs/{{ $job->id }}">
//  @csrf
    @method('PATCH')
So all you need to do is add a “@method(‘PATCH / DELETE’)” depending on what you want / need. As mentioned you can just think of “patch” as updating a resource.
Route Tips
Here are a few tips and techniques for your routes file to help keep it clean, maintainable and efficient.
1. Route Model Binding
Instead of manually fetching models by ID in your route closures, Laravel offers route model binding to automatically inject model instances based on route parameters.
For example, change this:
Route::get('/jobs/{id}', function ($id) {
    $job = Job::findOrFail($id);
    // ...
});
To this:
Route::get('/jobs/{job}', function (Job $job) {
    // $job is automatically resolved by Laravel
});
Key points:
- The route parameter name (
{job}) must match the variable name in the closure. - Laravel uses the model’s primary key (
idby default) to fetch the record. - You can specify a different column (e.g., slug) by adding
:slugto the route parameter.
Update all your routes to use route model binding for cleaner code.
2. Dedicated Controller Classes
For larger applications, managing many routes with closures becomes unwieldy. Instead, use controller classes to organize your route logic.
Generate a controller:
php artisan make:controller JobControllerMove your route logic into controller methods like index, show, create, store, edit, update, and destroy.
Update your routes to reference controller actions:
use App\Http\Controllers\JobController;

Route::get('/jobs', [JobController::class, 'index']);
Route::get('/jobs/create', [JobController::class, 'create']);
// etc.
3. Route View Shortcut
For simple routes that only return a view (like static pages), use the Route::view method:
Route::view('/contact', 'contact');This avoids creating unnecessary closures or controller methods.
4. Listing Routes
Use Artisan to list all your routes:
php artisan route:listYou can exclude vendor routes to focus on your app’s routes:
php artisan route:list --except-vendorThis helps you audit and manage your routes effectively.
5. Route Grouping with Controllers
To reduce repetition, group routes by controller:
Route::controller(JobController::class)->group(function () {
    Route::get('/jobs', 'index');
    Route::get('/jobs/create', 'create');
    // other routes...
});
This cleans up your routes file and makes it easier to maintain.
6. Route Resource
Laravel provides a convenient method to register all standard resource routes at once:
Route::resource('jobs', JobController::class);This registers routes for index, create, store, show, edit, update, and destroy actions following RESTful conventions.
You can limit or exclude specific actions:
Route::resource('jobs', JobController::class)->except(['edit']);
Route::resource('jobs', JobController::class)->only(['index', 'show', 'create', 'store']);
Before – After
Here’s a before and after of my routes file
Before the Tips:
<?php

use Illuminate\Support\Facades\Route;
use App\Models\Job;

Route::get('/', function () {
    return view('home');
});

// Index
Route::get('/jobs', function () {
    $jobs = Job::with('employer')->latest()->simplePaginate(3);

    return view('jobs.index', [
        'jobs' => $jobs
    ]);
});

// Create
Route::get('/jobs/create', function () {
    return view('jobs.create');
});

// Show
Route::get('/jobs/{id}', function ($id) {
    $job = Job::find($id);

    return view('jobs.show', ['job' => $job]);
});

// Store
Route::post('/jobs', function () {
    request()->validate([
        'title' => ['required', 'min:3'],
        'salary' => ['required']
    ]);

    Job::create([
        'title' => request('title'),
        'salary' => request('salary'),
        'employer_id' => 1
    ]);

    return redirect('/jobs');
});

// Edit
Route::get('/jobs/{id}/edit', function ($id) {
    $job = Job::find($id);

    return view('jobs.edit', ['job' => $job]);
});

// Update
Route::patch('/jobs/{id}', function ($id) {
    request()->validate([
        'title' => ['required', 'min:3'],
        'salary' => ['required']
    ]);

    // authorize (On hold...)

    $job = Job::findOrFail($id);

    $job->update([
        'title' => request('title'),
        'salary' => request('salary'),
    ]);

    return redirect('/jobs/' . $job->id);
});

// Destroy
Route::delete('/jobs/{id}', function ($id) {
    // authorize (On hold...)

    Job::findOrFail($id)->delete();

    return redirect('/jobs');
});

Route::get('/contact', function () {
    return view('contact');
});
After the Tips:
<?php

use App\Http\Controllers\JobController;
use Illuminate\Support\Facades\Route;

Route::view('/', 'home');
Route::view('/contact', 'contact');

// jobs
Route::resource('jobs', JobController::class);
As you can see it makes quite a big difference.
Authentication
Building Registration & Login Forms
- Create
register.blade.phpandlogin.blade.phpviews under anauthdirectory. - Use the form components to build inputs for first name, last name, email, password, and password confirmation.
- Add
requiredattributes for client-side validation.
Defining Authentication Routes and Controllers
- Add routes for showing registration and login forms (
GET /register,GET /login). - Add routes for handling form submissions (
POST /register,POST /login). - Create corresponding controllers like
RegisteredUserControllerandSessionControllerwithcreateandstoremethods.
Displaying Content Conditionally
Use Blade directives to show login and register links only to guests:
@guest
    <x-nav-link href="/login">Login</x-nav-link>
    <x-nav-link href="/register">Register</x-nav-link>
@endguest
Use @auth to show content only to authenticated users.
Registration Process
When a user submits the registration form, the following steps occur:
- Validation: Use
$request->validate()to ensure required fields like first name, last name, email, and password meet your criteria. Laravel provides many validation rules, including a fluentPasswordhelper for complex password requirements. - Creating the User: After validation, create the user in the database. You can pass the validated attributes directly to
User::create(). - Logging In: Use
Auth::login($user)to sign in the newly registered user. - Redirecting: Redirect the user to a desired page, such as the jobs listing or dashboard.
Example Validation Rules
$request->validate([
    'first_name' => ['required', 'min:1'],
    'last_name' => ['required', 'min:1'],
    'email' => ['required', 'email'],
    'password' => ['required', 'confirmed', Password::min(6)],
]);
The confirmed rule requires a matching password_confirmation field.
Login Process
When a user submits the login form:
- Validation: Validate the email and password fields.
- Authentication Attempt: Use
Auth::attempt($credentials)to try logging in. - Session Regeneration: On successful login, regenerate the session token for security.
- Redirect: Redirect the user to the intended page.
- Handling Failure: If login fails, throw a validation exception with an appropriate error message.
Preserving Input on Validation Errors
Use the old() helper in Blade to repopulate form fields after validation errors, improving user experience.
<input name="email" value="{{ old('email') }}" />Remember to prefix with : in Blade to treat as an expression:
:value="old('email')"Authentication Tips
1. Establishing Relationships for Authorization
To perform user authorization on a job, there must be a relationship between the job and a user. Currently, jobs relate to employers, but employers don’t relate to users. Fix this by adding a foreign key user_id to the employers table and updating the Employer factory to associate an employer with a user.
2. Inline Authorization in Controller
Add a simple authorization check in your job controller’s edit action:
- Redirect guests to login.
- Check if the authenticated user is responsible for the job.
- If not authorized, abort with a 403 status.
Use Eloquent relationships to traverse from job to employer to user, and compare with the authenticated user using the is method.
3. Gates
Extract authorization logic into gates for reusability and clarity.
- Define gates in
AppServiceProviderusing theGatefacade. - Gates return a boolean indicating authorization.
- Use
Gate::authorize('edit-job', $job)in your controller to enforce authorization.
Gates automatically abort with 403 if authorization fails, but you can use Gate::allows or Gate::denies for custom handling.
4. Using can and cannot Methods
Your User model has can and cannot methods to check permissions against gates. Use these in controllers or Blade views to conditionally allow actions.
@can('edit', $job)
    <p class="mt-6">
        <x-button href="/jobs/{{ $job->id }}/edit">Edit Job</x-button>
    </p>
@endcan
This code allows a user to only see the edit Job button if he’s authorized to do so. In this case that would be if he created the note.
5. Middleware Authorization
Apply authorization at the route level using middleware:
Route::patch('/jobs/{job}', [JobController::class, 'update'])
    ->middleware(['auth', 'can:edit,job']);
This ensures users are authenticated and authorized before accessing the route.
You can specify middleware per route or group routes for cleaner code.
6. Policies
Policies are classes that encapsulate authorization logic for a model.
- Generate a policy with
php artisan make:policy JobPolicy --model=Job. - Define methods like
edit,deleteto control access. - Register policies in
AuthServiceProvider. - Use policies via gates or
canmethods.
Policies provide a structured, scalable way to manage complex authorization rules.
Install Breeze
With Laravel 12 Breeze isn’t included as a starter kit by default anymore so if you want to use it, here’s how:
1. Setup a new Laravel Project
These starter kits are intended to be used at the start of a new project. So run this command with your chosen name at the end and when it asks which starter kit you would like to install choose “none”. Other than that you are free to choose up until where it asks you if you want to run “npm install” and “npm run build” there choose “no”. After it finished enter your new project “cd (your project name.)”.
laravel new (your project name)2. Install Laravel Breeze
Run this command to require Laravel Breeze.
composer require laravel/breeze --dev3. Install Breeze
Now you can run this command to install Laravel Breeze. After which you can choose which Breeze stack you want (if you Laracasts with Jeffrey then you will probably familiar with “Blade with Alpine”).
php artisan breeze:install4. Run migrations
Breeze comes with migrations for the authentication system. Run the migrations to set up the necessary database tables:
php artisan migrate:freshThe next 2 steps are not needed when using “Laravel Herd”
5. Compile Assets
If you want to use the default styling, you need to compile the assets using Laravel Mix:
npm install && npm run dev6. Serve your Application
Finally, you can serve your application to see Breeze in action:
php artisan serveE-Mails
Generating a Mailable
Create a mailable class with Artisan:
php artisan make:mail JobPostedThis creates a class in app/Mail/JobPosted.php where you can define:
- Envelope: Set email subject, sender, reply-to, and tags.
- Content: Specify the Blade view for the email body.
- Attachments: Add files if needed.
Creating the Email View
Create a Blade view in resources/views/mail/job-posted.blade.php with your email content:
<p>Congrats, your job is now live on our website.</p>Previewing the Email
Add a temporary route to return the mailable for preview:
Route::get('/test', function () {
    return new \App\Mail\JobPosted();
});
Visit /test in your browser to see the email rendered.
Sending Emails
Use the Mail facade to send emails:
use Illuminate\Support\Facades\Mail;

Mail::to('jeffrey@laracasts.com')->send(new \App\Mail\JobPosted());
By default, in local environments without SMTP configured, emails are logged to storage/logs/laravel.log. Or if you use Laravel Herd Pro it will open an inbox automatically, since with Pro it has a mail server included.
Configuring Mail Settings
Edit config/mail.php or your .env file to set mail driver, SMTP host, port, username, and password.
Example for Mailtrap (a popular testing service):
MAIL_MAILER=smtp
MAIL_HOST=sandbox.mailtrap.io
MAIL_PORT=2525
MAIL_USERNAME=your_username
MAIL_PASSWORD=your_password
MAIL_FROM_ADDRESS=info@laracasts.com
MAIL_FROM_NAME="Laracasts"
Passing Data to Mailables
You can pass data to your mailable’s constructor and expose it as public properties for use in the email view:
public $job;

public function __construct(Job $job)
{
    $this->job = $job;
}
In the Blade view, access $job to display dynamic content.
Generating URLs in Emails
Use Laravel’s url() helper to generate full URLs in emails:
<a href="{{ url('jobs/' . $job->id) }}">View your job listing</a>This ensures URLs work in both local and production environments.
Queues
Queue Configuration
Laravel supports multiple queue drivers:
- sync: Runs jobs synchronously (default, useful for local development).
- database: Stores jobs in a database table.
- beanstalkd, SQS, Redis: More robust queue backends.
The default queue connection is set in .env via QUEUE_CONNECTION. For example:
QUEUE_CONNECTION=databaseThe database driver uses a jobs table to store queued jobs and a failed_jobs table for failed ones.
Dispatching Jobs to the Queue
In your JobController, change:
Mail::to($user)->send(new JobPosted($job));to:
Mail::to($user)->queue(new JobPosted($job));This queues the email instead of sending it immediately.
Running the Queue Worker
To process queued jobs, run:
php artisan queue:workThis command listens for jobs and processes them as they arrive.
Queued Closures
You can dispatch simple queued closures:
dispatch(function () {
    Log::info('Hello from the queue');
})->delay(now()->addSeconds(5));This runs the closure after a delay, useful for deferred tasks.
Creating Dedicated Job Classes
Generate a job class:
php artisan make:job TranslateJobDefine the job’s logic in the handle() method. Dispatch it with:
TranslateJob::dispatch($jobListing);IMPORTANT! Remember to restart your queue worker after code changes, because it saves it into its memory. Like php artisan tinker.
Asset Bundling & Vite
Here’s a short explanation about asset bundling and Vite in Laravel, which optimize and manage your application’s frontend assets like CSS, JavaScript, and images for production.
What is Asset Bundling?
Asset bundling combines and optimizes your assets to reduce load times and improve performance. This includes minification, compression, and efficient loading.
Using Vite in Laravel
Laravel integrates with Vite out of the box. Your package.json includes dependencies like vite and @vitejs/plugin-vue.
Installing Node.js and NPM
Ensure you have Node.js and npm installed. Check with:
node -v
npm -vDownload from nodejs.org if needed.
Vite Configuration
The vite.config.js file specifies entry points for your CSS and JavaScript, typically located in the resources directory.
Running Vite
Use npm scripts to run Vite:
npm run dev— starts the development server with hot module replacement (HMR).npm run build— compiles and optimizes assets for production.
Including Assets in Blade
Use Laravel’s @vite directive in your Blade templates to include your compiled assets:
@vite(['resources/css/app.css', 'resources/js/app.js'])Hot Reloading
While running npm run dev, changes to your CSS or JS files automatically refresh the browser, improving development speed.
Tailwind CSS Integration
Instead of using the CDN, install Tailwind CSS via npm for production:
npm install tailwindcss @tailwindcss/viteAdd Tailwind directives to your CSS. Like so:
@import 'tailwindcss';

@source '../../vendor/laravel/framework/src/Illuminate/Pagination/resources/views/*.blade.php';
@source '../../storage/framework/views/*.php';
@source '../**/*.blade.php';
@source '../**/*.js';
@source "../views";

@theme {
    --font-sans: 'Instrument Sans', ui-sans-serif, system-ui, sans-serif, 'Apple Color Emoji', 'Segoe UI Emoji',
        'Segoe UI Symbol', 'Noto Color Emoji';
    --color-laracasts: rgb(50 138 241);
}Building for Production
Run:
npm run buildto generate optimized, minified assets for deployment.